How to renovate an Electrolux ZA65 vacuum cleaner |
N.B. This web page is only intended to help you work on your vacuum cleaner, but I don't take any responsibility for any damage or injuries which result.
The ZA65 was made between 1960 and 1964, when it was replaced by the Luxomatic. There were lots of variations of this model including some metal parts being replaced by plastic. There is a page showing the American versions on eVacuumStore which doesn't include the ZA65.
For some reason, there is also the Volta U147, made in Sweden, which appears identical to the Electrolux Z91 and Z94.
I couldn't find any official diagrams of the ZA65's parts, so here are some photos showing some of them, with the parts listed below.
Parts list. | |||||||
| Electrolux part number |
Description | Number fitted |
Part number on pictures |
Last seen approximate price or availability | |||
| ? | Input end cover | 1 | A | . | |||
| ? | Bag holder | 1 | B | . | |||
| ? | Chrome plate for input end of body | 1 | C | . | |||
| ? | Rubber seal for part C above | 1 | D | . | |||
| ? | Exhaust end surround | 1 | E | . | |||
| ? | Plug socket housing | 1 | F | Plug socket housing last seen at £4 + £1.50 p&p from elecricalsplu5. | |||
| ? | Exhaust end hose-connection panel | 1 | G | Note that these can be metal or plastic but seem interchangeable. | |||
| ? | Exhaust end HEPA-type filter | 1 | H | . | |||
| ? | Switch assembly | 1 | J | . | |||
| ? | Cover plate for motor housing | 1 | K | . | |||
| ? | Runner | 2 | L | . | |||
| To be completed | |||||||
Bags. | |
|
This shows the bag holder and some bags. The bags do not need a fancy cardboard piece, they simply push down into the cloth bag. The top of the bag is then squeezed together, pushed through the hole in the plastic frame and then spread out over the frame.
|
|
|
This shows one of the possible makes of bags (to help with locating them).
|
|
Before dismantling. | |
|
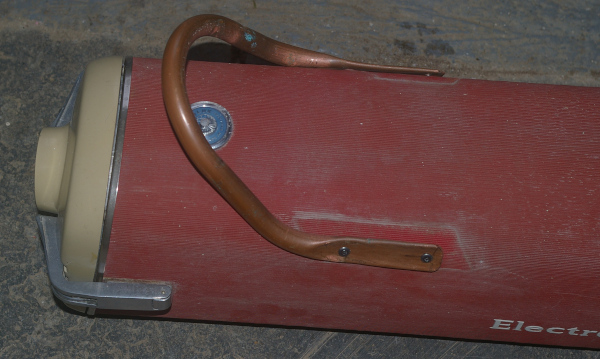
This shows my vacuum, before working on it. You can see the broken handle. This seems to be a common problem as it was the same on both of mine. See further down for how to cobble together a replacement.
|
|
|
This shows the exhaust end of the vacuum, before working on it.
|

|
|
This shows the input end of the vacuum, before working on it.
|
|
|
This shows the underneath of the vacuum, before working on it. You can see the hanger, which clicks into hanging or out-of-the-way positions. The well-designed sliders are also shown, with their rollers.
|

|
|
This shows the name plate of one of my vacuums. It shows how little power (450W) the vacuum uses whilst having a decent suction. It also shows the amazing range of voltage allowed for - 230V to 250V, 25 to 60 cycles per second or DC.
|
|
Working on the main body. | |
|
This shows the runners removed from one of my vacuums.
You can see that these were in a rusty state.
The bolts which held them can be seen.
|
|
|
This shows the very perished rubber strip on the input end plate clamp. I've just levered out the gunge for now and will look round for some other strip to fit.
|
|
Working on the intake end. | |
|
Here is the vacuum with the end cover unclipped. You can see the bag removed from its cloth bag but still pushed through the plastic holder. In the background can be seen the body with the metal plate which prevents access to the motor at this end.
|
|
|
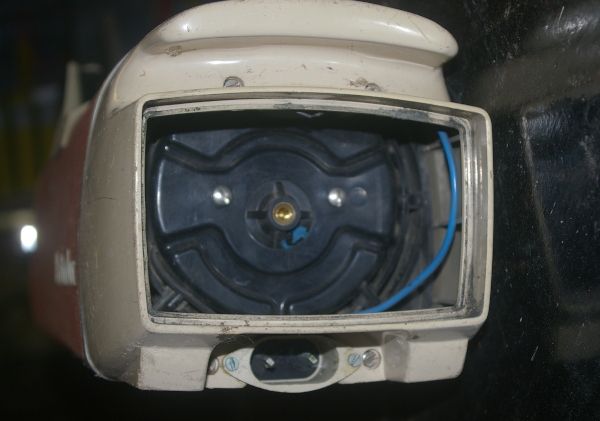
This shows the metal end plate removed. The top screws just need a flat-head screwdriver. The bottom bolts need an 8mm spanner. Now's the time for some chrome cleaner.
|
|
|
This shows the hanger removed - using a flat-head screwdriver. Note that it is spring-loaded to make sure it doesn't snag anything when pulling the vacuum along.
|
|
Working on the exhaust end. | |
|
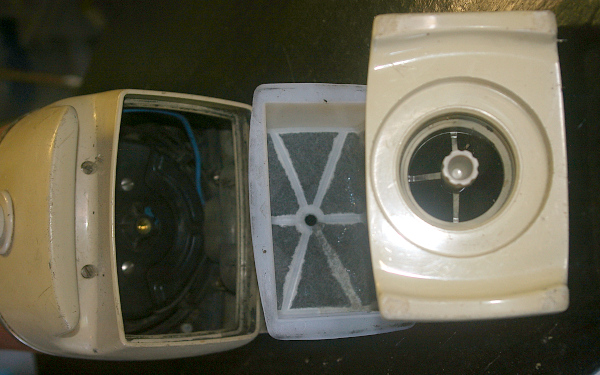
Unscrew the knurled knob to free the (plastic or metal) end plate. The exhaust filter can now be pulled out. I assume this was fitted in order to stop any motor debris being blown out - especially when using the paint sprayer attachment. It also acts as an early version of a HEPA filter. The filter can be cleaned using water and an old toothbrush (gently).
|
|
|
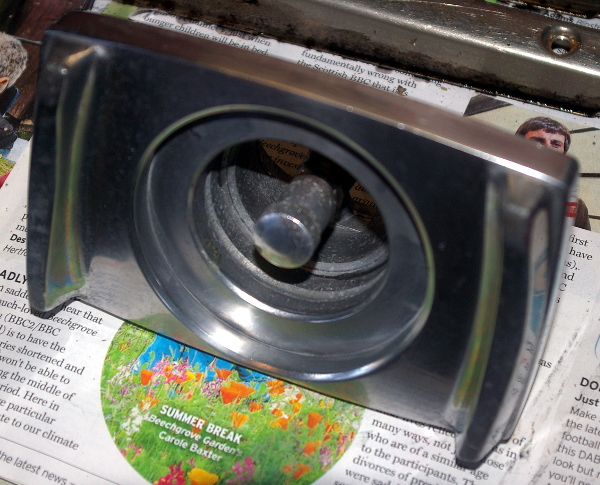
This shows an alternative metal exhaust end cover. This one is from a ZA65, serial a, Number E0220483.
|
|
|
This shows the exhaust end cover with the motor housing inside. It also shows the mains connector.
|
|
|
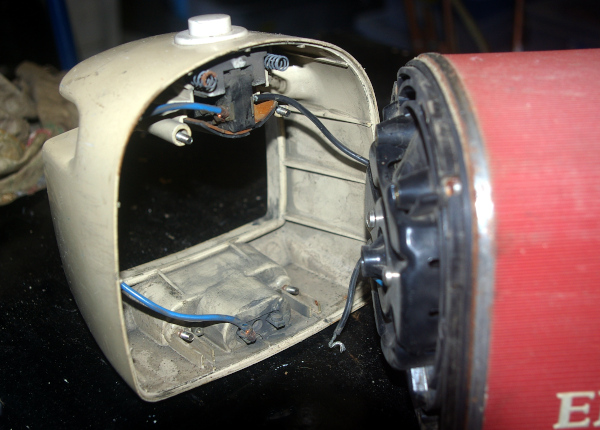
This shows the exhaust end cover removed, allowing access to the motor housing and the switch. You can see the tapered springs which hold the switch in place.
|
|
|
This is another view with the exhaust end cover removed. You can see the four bolts which held the cover and which just needed a flat-head screwdriver to remove. The protecting plates have been pulled out from the bottom of the switch. |
|
Working on the switch. | |
|
This shows the removal of the two screws which retained the switch mechanism.
|
|
|
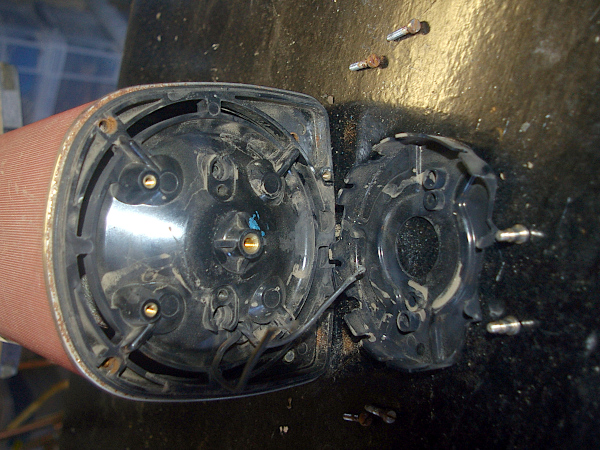
This shows the switch housing after removing the button mechanism.
|
|
|
This shows the switch parts including its rocker lever.
|
|
|
This shows the switch rocker lever in the correct order for reassembly.
|
|
|
This shows the switch itself with the spring-loaded part which the rocker lever operates. Mine just needed a clean-up with a rag and methylated spirits. Now is a good time to apply some solder to the wires before reassembly - in order to get the best possible connections. |

|
Replacing the handle.I couldn't find anywhere selling replacement handles, so I made one up using 15mm copper pipe.To do the same, you will need:
| |
|
This shows one rivet on the old handle being cut off. After sawing through, use a hammer and punch (or nail, etc.) to knock through the remains. Make sure you remove the remains from inside the vacuum body to ensure they don't get sucked into the motor.
|
|
|
This, and the next image, show the shape required for the new handle. It will need to be this sort of shape to allow for winding the flex and for having the grip-point positioned near the centre of gravity of the vacuum. The ends will need to be flattened using a hammer, then filed off and drilled to take your pop-rivets. I recommended long rivets to allow for pulling the handle into the body if it's not quite the right shape.
|
|
|
This shows more the shape required for the new handle. You can see what I've done to the ends.
|
|
|
This shows new handle riveted in place.
|
|
Working on the motor.I need to point out that I failed to properly access the motor on mine.I have two of the vacuums and, on the first, I spent quite a while trying to remove the motor from the body, and failed (see below). I then tried running the motor anyway and rapidly achieved some rather unfortunate sound-effects. I then took my other vacuum and tried it and it worked OK. So, going by the "if it ain't broke, don't fix it" principal, I've left it alone. I have now used some drastic methods to examine the first motor and show results below.
| |
|
This shows the motor mount cover and the motor mount bolts removed. The cover seems to be there in order to keep the wires in place.
|
|
|
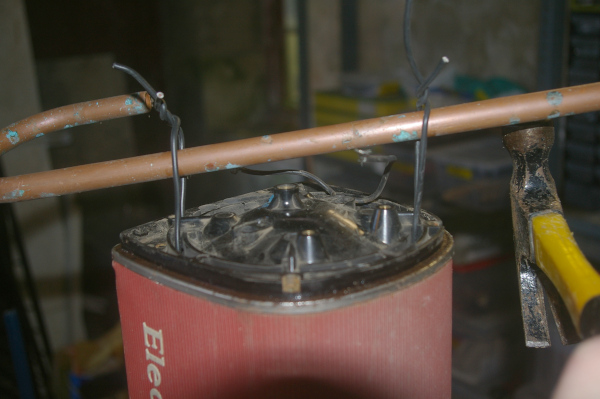
This shows the rubber seal removed from around the motor mount. Having failed to work the mount loose from the vacuum body, by hand, I put some lengths of wire through the mount vents, as shown, and then....
|

|
|
I then suspended the vacuum from the wires and tried tapping the support. The whole thing failed, because the vacuum body had rusted around the joint with the mount. Please let me know if you manage the removal. See below for a worse method, and further down for the motor itself. |
|
|
What I have done, here, is a destructive method, not to be used if you want a working vacuum again. It does give access to the motor but is only suitable if you want it as spare parts, or to use elsewhere. Basically, I took a hacksaw and sawed around the top and sides of the case, just behind the motor mount. Obviously, you need to only make shallow cuts, just through the case, so as to avoid cutting the motor in half! There will also be loads of iron filings which need to be cleared off the motor - especially on the magnets. |
|
|
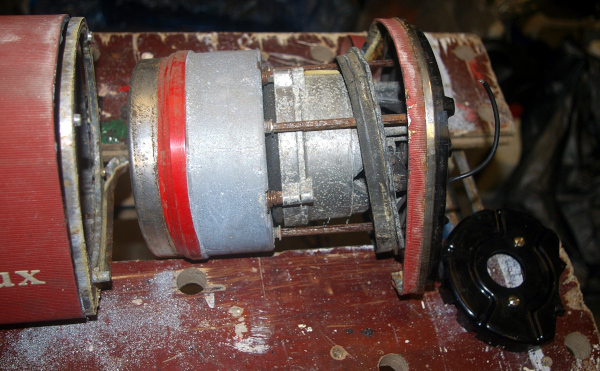
Firstly, you can see that this motor has hard a hard life. This shows the motor's mounts. It's sprung-mounted all over the place. The long bars are clipped into the fan surround, but screw into the end plate. Undo these, making a few turns on each, until they come free of the end plate. |
|
| This shows the end plate with the long bars screwed into it. |
|
|
This shows the end plate, freed up. You can see where the long bars unscrewed from. You can also see the flying buttresses of the motor with springs and rubber caps - and the end plate sockets where they located. |
|
|
Here is one of the commutator brushes, held in place by a couple of screws. And, yes, it is covered in iron filings but this motor was knackered anyway. There was a considerable amount of carbon brush left given the age of the vacuum. |
|
| Here is the end of the motor with its bolts unscrewed, allowing access to the bearing (this one being in good condition). |
|
| Now the motor core is removable, with the end bearing. |
|
|
The fan cover consists of two halves, pushed together. There was also a strip of tape wrapped around it. Mine was difficult to separate so I used the end of a hammer to help pull them apart. |
|
|
There is a nut to undo at the end of the fan assembly. Now the fans pull free of the motor. The rather amazing arrangement probably explains the efficiency and silence of the vacuum. Basically, it's split into two centrifugal fans with a straight-flowing rotor between. There is then a flow-guide, held by two screws (as shown). |
|
|
This shows the flow guide removed, Behind it are the clips retaining the long motor-mounting bars. You can now pull off the fan case and access the bottom bearing of the motor. |
|
|
This is the bearing with its cover undone. You can see that my one is not in pristine condition. On the bench are the remains of some of the ball bearings. This was evidently the cause of the nasty noises made by the motor when it was tried. The ball race was, however, still in good condition and so a replacement set of ball bearings would presumably fix the problem. |
|
Please let me know if the above helped, or if you found any mistakes or better solutions, or more information about this model (see below).
| |
This page last updated 22nd. November 2020.
Images and text © Copyright Jim Batten, 2019-2020.